
Since the time change last weekend for daylight savings, the fallness of fall has hit me hard. It's dark before I leave work everyday and it makes me feel like I should already be in bed. It has made the idea of hibernating very appealing.
One of my favorite TV shows, QI, once featured the excellent gem of trivia that French peasants used to practice a sort of hibernation. The indomitable Stephen Fry explained that French peasants used to sleep through much of the winter, occasionally emerging from their slumber to eat a biscuit and then go back to sleep. This was and is hugely appealing to me. It makes sense, in the winter when there is less work to do, and less daylight to do it in, to just curl up and wait out the cold and dark. I'm sure some poor soul had to get up regularly and feed the cows, but generally people slept away large portions of the winter. According to this great New York Times article, the practice wasn't limited to France; it was practiced in other regions with long cold winters. Of course, technically these people didn't really hibernate. Their metabolisms and physiology most likely didn't radically alter in the same way that hibernating animals' bodies do. Humans can't just pack on body fat and then live on that fat for long periods they way some animals can. Sadly.
If you are looking to replicate this lifestyle as winter comes as I am, I would highly recommend the apple & hazelnut financier as a biscuit of choice to occasionally break your hibernation fast. Toasty, buttery and thoroughly cold weather appropriate, they might be a little more luxurious than the biscuits available to the 19th century peasantry, but they are tasty enough to trump historical authenticity. Unfortunately, I think that several factors have conspired against my ever really realizing this fantasy, electric lights that let us toil away after sunset and the annoying need to work through the winter to pay rent among them. But I can still have some little cakes.

apple & hazelnut financiers:
adapted from cannelle et vanille
- 120 grams egg whites
- 125 grams sugar
- 55 grams white rice flour or all purpose flour
- 25 grams almond meal
- 30 grams hazelnuts, toasted and ground into meal
- 1 tsp vanilla
- 150 grams butter, melted and cooled (browning the butter will add extra nuttiness!)
- 1 apple, very thinly sliced
Combine sugar, flour, nut meals and vanilla in a mixing bowl. Add egg whites and stir to combine. Stir in butter, cover bowl with plastic wrap and age in the fridge overnight.
Generously grease financier tins or muffin tins. Fill with batter; only about 1/2 inch high if you are using muffin tins, up to the brim if you are using financier tins. Place one apple slice a little on top of each financier.
Bake at 375 for about ten minutes, until the centres are set and the edges are browned. Cool and then run a knife around the edge of the tins and gently remove the financiers. Enjoy these financiers snuggled down under a quilt, and Rip Van Winkle yourself until the spring.
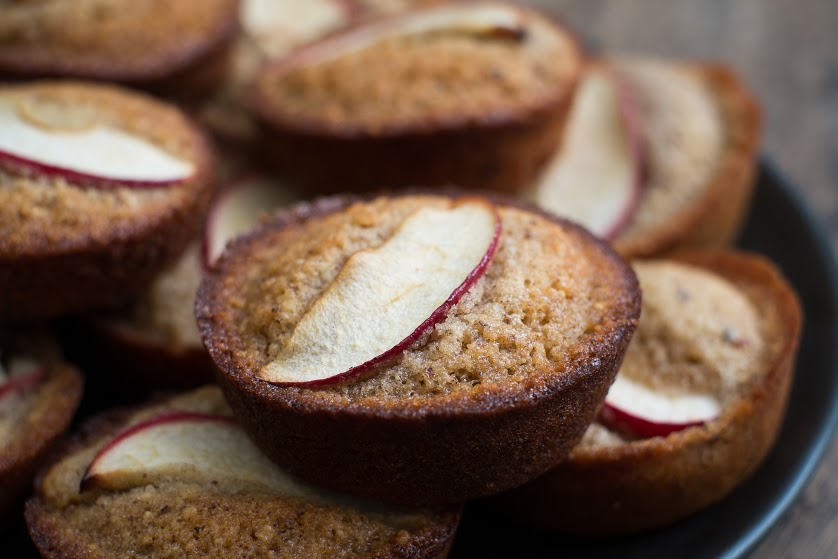
Photo credits: Tyrel Hiebert