• Home
  • About me
  • Recipes
  • Contact
Menu

the verdigris

Street Address
City, State, Zip
Phone Number
eat.drink.dig.make.grow.play

Your Custom Text Here

the verdigris

  • Home
  • About me
  • Recipes
  • Contact

herbed harissa & feta carrot salad

January 27, 2015 Stephanie Inman

I know that January is basically over, but I still feel like I am rebounding from my steady holiday diet of chocolate, cookies, wine and beef wellington. This salad is exactly the kind of thing I like to eat a lot of when I have spent a couple weeks eating...richly. It helps me feel balanced to eat big bowlfuls of bright, tasty vegetables. 

I saw this recipe over at smitten kitchen a little while ago and it looked great; I slotted it away in the back of my mind as a thing to try and then half forgot about it. Then I heard Molly Wizenberg talking about on Spilled Milk's carrot episode (Spilled Milk is a great podcast by the way, you should all go check it out!) and I remembered my intention to eat this salad. After it came so highly recommended by two brilliant women, I really had no choice. 

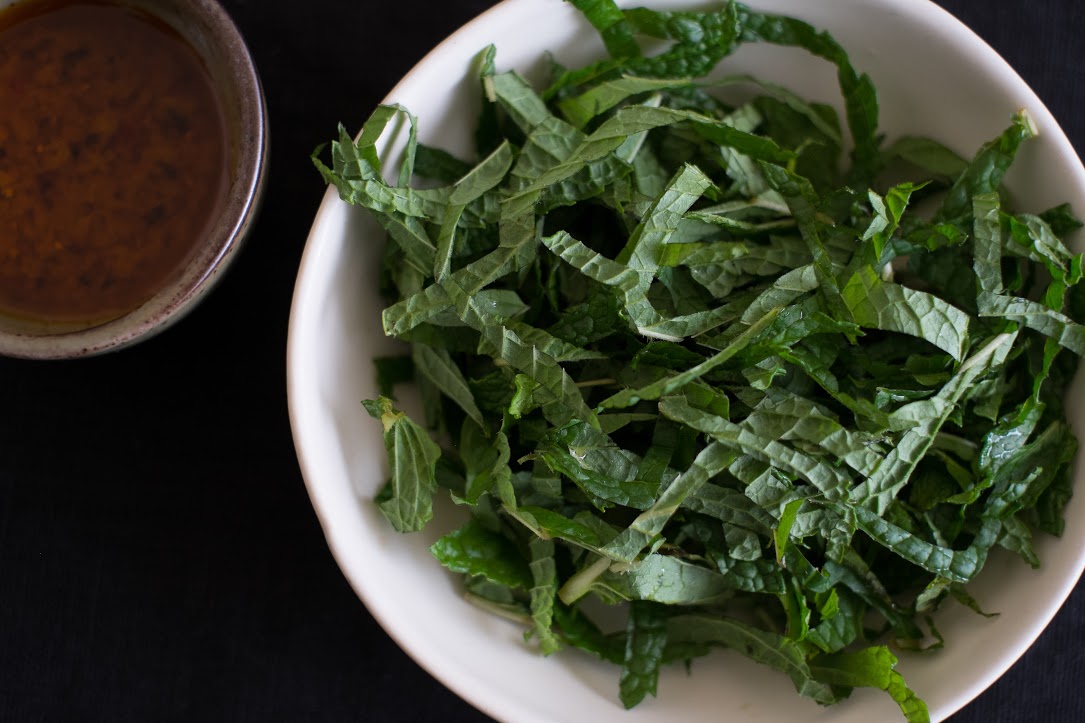
I made a few changes; I upped the herbs a lot. The original calls for a couple tablespoons each mint and parsley, I used at least a cup of each. I like how fresh and bright it is with large amounts of herbs, and it feels luxurious to treat them as another vegetable rather than a garnish. 

Note: Harissa is a chili and spice paste from North Africa. You can find it lots of supermarkets or specialty food stores. It's worth hunting around for, but if you're having difficulty finding it, this dressing will still be great with some chili flakes or powder for some heat.  

herbed harissa & feta carrot salad:

adapted from the genius smitten kitchen (where it was adapted from a reader, who adapted it from her mother who may have adapted it from cuisine magazine)

  • around 10 large carrots, washed and peeled if you feel like it (I didn't)
  • 1 cup parsley, finely chopped 
  • 1 cup mint, finely chopped 
  • 1/3 cup olive oil 
  • 1/3 cup lemon juice 
  • 2 cloves garlic, grated on a fine rasp 
  • 1 1/2 tsp cumin (I like a lot of cumin, but you can dial it back if you prefer) 
  • 1/2 tsp paprika
  • 1 tsp harissa (I have a really mild harissa and I actually used more than this. Add it a bit at a time until you have the heat you would like)
  • 1/2 tsp sugar 
  • salt and pepper
  • 1/21 cup feta, crumbled

Grate the carrots on the large holes of a box grater or on a food processor grater blade if you have one. Toss carrots, mint and parsley together in a bowl.

Combine all other ingredients together in a small jar and shake to combine. Drizzle over carrots and toss to combine. Let the salad sit and absorb the dressing for at least a half hour. Sprinkle feta over salad and eat it up. 

Photo credits: Tyrel Hiebert 

Tags salad, carrot, feta, mint, harissa
Comment

mini beef wellingtons, step-by-step: assembly

December 24, 2014 Stephanie Inman

If you have been following along with the beef wellington posts, you will already have puff pastry, duxelles and green peppercorn sauce. You are practically finished already. Now it's time to put everything together and make some wellingtons! I'm giving instructions for individual portions because I like how they look on the plate: like little parcels or wrapped up gifts. They are more handsome served than slices of a large beef wellington, which never turn out like the beautiful, even layered cross-section slices I see in pictures on other recipes. For me, the slices wind up slumped sadly and frequently missing layers that got stuck to somebody else's slice. Making individual portions solves this problem and provides a very generous ratio of pastry to everything else. 

Happy holidays, merry christmas, talk to you next year! 

mini beef wellingtons: 

  • 1 beef tenderloin, thin end removed and saved for another use.

  • 1/2 recipe puff pastry

  • 1 recipe duxelles

  • 4 slices pancetta

  • 1 egg

  • a splash of cream

  • 1 recipe green peppercorn sauce

Salt and pepper the beef on all sides and sear over high heat until browned all over. Remove and cool. Slice into four small steaks, as evenly sized as possible (I made them about 1 1/4 inches thick). 

Mix the egg and cream to make a was for the tops of the beef wellington. Set aside. 

Roll out puff pastry, using a bench scraper to keep it in a square. Roll it out until it is about 20" x 20". Cut the pastry into four equal squares. 

Lay a slice of pancetta over a square of puff pastry, so that it hangs off the edge. 

DSCF3918.jpg

Smear a little duxelles over the pancetta and place a piece of tenderloin on top. Add duxelles to the top and sides of the beef. 

Wrap the overhanging pancetta over the top of the tenderloin and pull the corners of the pastry over the top of the meat. Brush egg wash over the pastry edges as you work so the overlapping pastry is glued together. 

Repeat this assembly process with the remaining pastry squares. Brush them all over with the egg wash. 

 Bake wellingtons at 425 until the pastry is golden brown and the internal temperature is between 125 (rare) and 140 (medium). 

Serve with warm green peppercorn sauce and roasted vegetables. 

Photo credits: Tyrel Hiebert

In meat Tags beef wellington, christmas, holiday, puff pastry
2 Comments

mini beef wellingtons step-by-step: green peppercorn sauce

December 22, 2014 Stephanie Inman

I think green peppercorn sauce might be magic. It is salty and beefy and creamy and wonderful. Even if you aren't going to make the whole beef wellington, I recommend trying the sauce, on a steak or a roast.  I would also recommend doubling this recipe, because you might find yourself eating a lot of things dipped in peppercorn sauce, it's almost impossible to stop eating it once you have started. 

The other reason I like making this sauce so much, is that you get to set it on fire! I like any recipe that involves setting things on fire or using a blowtorch, it's so exciting-if mildly hazardous. A couple years ago when I made this sauce, I nearly burnt my eyebrows off-the fumes from the brandy can create quite a large flare up. I recommend the use of long kitchen matches for this task. 

green peppercorn sauce: 

adapted from the food network 

  • a little butter or lard 
  • 2 shallots, peeled and halved
  • 2 cloves garlic, peeled and smashed
  • 1 cup brandy
  • 4 cups beef stock
  • 2 cups cream
  • 1/4 cup green peppercorns, slightly crushed

In a large, deep saucepan, sauté the garlic and shallots in fat over medium heat until the begin to soften and colour. Take the pan off the heat and add the brandy. Set brandy alight using a long kitchen match (taking care not to set yourself or anything else unintentionally on fire) and wait for the flame to die completely. Add the beef stock and, over medium-high heat, reduce stock by about half. Strain out the solids and add the cream. Reduce by half again and add the peppercorns. 

The sauce can be made a day ahead and refrigerated. Reheat before serving. 

Beef wellington part 1: Puff Pastry

Beef wellington part 2: Duxelles 

Photo credits: Tyrel Hiebert

Comment

beef wellington step by step: duxelles

December 18, 2014 Stephanie Inman

Duxelles is a mushroom paste that goes inside of beef wellington. It can be made in advance and stored in the fridge for a day or two, or frozen for longer. It's pretty straightforward to make, you barely need a recipe! 

Finely chop about 6 cups of mixed mushrooms, a few peeled cloves of garlic and a couple of peeled shallots. If you have a food processor, its very helpful for this part, but you can chop them by hand. Sauté the mushrooms in a little butter over medium heat until they begin to sweat. Add a little salt to encourage them to shed more water and continue to sauté until they are reduced in size by about half. That's duxelles! 

If you aren't making beef wellington, duxelles is also great smeared on a piece of bread with some goat cheese. It's an easy appetizer, or if you're like me, it's a great lazy dinner. 

Mini beef wellingtons part 1: Puff Pastry

Mini beef wellingtons, part 3: Green Peppercorn Sauce 

Photo credits: Tyrel Hiebert

Comment

mini beef wellingtons step-by-step: puff pastry

December 15, 2014 Stephanie Inman

The issue of what to have for christmas dinner (or the non-christmas winter holiday dinner of your choice) is controversial. As much as I enjoy turkey, it seems like the wrong option to me. Many people (me included) have just eaten a turkey for thanksgiving, the only other turkey they are likely to eat all year. Having another one so soon makes no sense to me. If you had american thanksgiving, you just had a turkey at the end of November! We have foolishly cornered nearly all of our collective turkey consumption into a tiny window of the year.  I advocate for variety in our winter gluttony-based festivals. 

My family has been having beef wellington for christmas dinner for a few years, and, from the very first time we had it, I felt that it was a superior holiday entree option. It is meat, wrapped in another meat, wrapped in pastry-I think it's wise to take every opportunity to eat tasty food wrapped in other tasty foods. 

Beef wellington is a little complicated to make; there are a lot of steps and it can be a bit intimidating. However, a few steps can be done in advance, which makes the assembly easier on the day.  The pastry can be made several days in advance and stored in the fridge or made even further in advance and frozen. Or it can be purchased! Puff pastry is really fun to make (I think so anyway) but store bought is still really good, especially if you can buy  all butter puff pastry. Feel free to skip this whole step if you aren't inclined to make puff pastry at home. I have broken the recipe down into several posts to this isn't a monstrously long post and the next steps are coming soon!

I made four individual portions of beef wellington, which only used halve of the puff pastry this recipe makes. Freeze the other half for another use, or double the rest of the recipes for eight portions. 

puff pastry: 

adapted from foodbeam

wet dough: 

  • 150ml water
  • a big pinch flaky salt 
  • 350g flour
  • 110g butter, melted and cooled

In the bowl of a stand mixer, mix flour, salt and butter until they are just combined. Using a low speed, slowly add water, only adding enough to bring the dough together without making it sticky. Turn the dough out onto plastic wrap and press into a large rectangle with the palm of your hand. Refrigerate, tightly wrapped in cling wrap. 

butter dough: 

  • 375g butter
  • 150g flour

Cream the butter on a high speed in a stand mixer for two minutes. Add the flour and mix quickly until just combined. Press into a rectangle on plastic wrap, the same size as the wet dough. Wrap tightly and refrigerate both doughs for at least two hours. 

On a lightly floured surface, roll the wet dough out to twice its original length. Place the butter dough onto one half of the rolled out wet dough, as in the photo below. Fold the wet dough over the butter block and tuck the edges in around the sides so no more of the butter block shows. Roll out this layered block twice as long again. 

Fold the outside edges into the center of the rectangle. 

Fold toward the center again. Your dough should look like the picture below. Refrigerate for at least two hours. 

Roll dough out again and repeat the fold and roll process two more times. The dough is ready! Store in the fridge, tightly wrapped in plastic wrap, or in the freezer if you will be keeping it for longer than a few days. 

Photo credits: Tyrel Hiebert

Comment

cream of mushroom soup

November 15, 2014 Stephanie Inman

I was an alarmingly picky child, also an alarmingly picky teenager and an alarmingly picky young adult. Many foods were frightening to me, especially those with a slimy or slippery texture. Eggplant, onion, zucchini and mushrooms were particularly intimidating. Mushrooms most of all; they were squishy and slippery and they freaked me out. The mushroom aversion was also one that persisted as I managed to grow out of some of my other food fears. Even as I started to eat onions and eggplants, my mushroom dislike just dug in its heels. I knew logically that mushrooms tasted good, from when I tried them inadvertently and from the way people talked about them, I knew they had a meaty, rich, umami lovely flavour. I wanted to like them, but I just didn't. So squishy. 

This soup was the gap-bridger, the recipe that let me start to really love mushrooms. This soup is the mushroom gateway drug. It sold me on mushrooms so thoroughly that I was able to start trying them in other non soup applications. And they were great! I'm sure you guys probably already know that mushrooms are great, if you weren't all so pathologically picky. But they are great, and so's this soup. 

cream of mushroom soup: 

  • 1 large yellow onion, roughly chopped
  • 1 whole head garlic, peeled and smashed
  • 4 cups beef, vegetable or mushroom stock
  • 4 cup mixed mushrooms, chopped. I used chanterelles, crimini and shiitake
  • 1 cup light cream
  • salt and pepper
  • 1/2 bunch parsley, roughly chopped (optional) 
  • a teeny splash of truffle oil (optional) 

Sauté onion and garlic in oil over medium heat until they are beginning to colour.  Add mushrooms, stirring occasionally. Sprinkle a little salt over them to help them release water. Continue to cook them until the water is mostly evaporated. Add stock and cook over medium heat for around half an hour to concentrate the stock slightly. Add the cream and season with salt and pepper. 

To cream the soup, either use an immersion blender and purée until the consistency you want is achieved (I like to blend until the soup is mostly smooth with some chunkier mushroom pieces are left) or blend in a blender. Stir through most of the parsley, if using, and reserve a little to sprinkle over the top. 

 Serve with parsley, and a couple drops of  truffle oil drizzled over each bowl if you wish. A few toasted slices of baguette would be pretty great too.  

Photo credits: Tyrel Hiebert

Comment
← Newer Posts Older Posts →
Become a patron

Subscribe

Sign up to receive my monthly round up!

We respect your privacy.

Thank you!

Instagram

These bright and sunny cookies are stuffed full of tart lemon curd, and slightly vegetal from a good amount of basil pulsed into the sugar. The result is a chewy, herbaceous cookie that bursts with gooey lemon centres. Link in bio or here www.theverd
These bright and sunny cookies are stuffed full of tart lemon curd, and slightly vegetal from a good amount of basil pulsed into the sugar. The result is a chewy, herbaceous cookie that bursts with gooey lemon centres. Link in bio or here www.theverdigris.ca/blog/basil-lemon-curd-sugar-cookies * * * * * * * #cookies #lemon #basil #baking #kitchn #foodfluffer @foodblogfeed #foodblogfeed #instafood #thebakefeed #gloobyfood #hautescuisines #f52grams #huffposttaste #huffpostgram @feedfeed #feedfeed #foodphotography
From the archives: Crispy chocolate peanut butter squares: a candied, crispy puffed cereal base with layers of peanut butter and chocolate, all balanced with a good pinch of flaky salt. It’s like the best combination of a rice-crispy and a Reec
From the archives: Crispy chocolate peanut butter squares: a candied, crispy puffed cereal base with layers of peanut butter and chocolate, all balanced with a good pinch of flaky salt. It’s like the best combination of a rice-crispy and a Reece’s peanut butter cup. Search “the verdigris crispy peanut butter chocolate squares or use this link for the recipe: www.theverdigris.ca/blog/chocolate-peanut-butter-crispy-squares * * * * * * * #chocolate #peanutbutter #ricecrispy #kitchn #foodfluffer @foodblogfeed #foodblogfeed #instafood #thebakefeed #gloobyfood #hautescuisines #f52grams #huffposttaste #huffpostgram @feedfeed #feedfeed #foodphotography
Apricot and amaretti crumble - crisp, crumb topping softens on the bottom where it meets thick, gooey, sticky sweet-tart fruit. Crunchy, almond scented amaretti cookies spike through the crumb topping. Plus, fresh apricots look like the cutest little
Apricot and amaretti crumble - crisp, crumb topping softens on the bottom where it meets thick, gooey, sticky sweet-tart fruit. Crunchy, almond scented amaretti cookies spike through the crumb topping. Plus, fresh apricots look like the cutest little butts. Link in bio or here www.theverdigris.ca/blog/apricot-and-amaretti-crumble * * * * * * * #crumble #apricots #amaretti #baking #kitchn #foodfluffer @foodblogfeed #foodblogfeed #instafood #thebakefeed #gloobyfood #hautescuisines #f52grams #huffposttaste #huffpostgram @feedfeed #feedfeed #foodphotography
From the archives: A bit of a twist on a classic: these cookies have white chocolate, macadamia nuts and a little toasted coconut. I boosted the coconut flavour with a tiny bit of coconut extract, which you can leave out if you aren’t a fan. Wh
From the archives: A bit of a twist on a classic: these cookies have white chocolate, macadamia nuts and a little toasted coconut. I boosted the coconut flavour with a tiny bit of coconut extract, which you can leave out if you aren’t a fan. White chocolate can sometimes be way too sweet, so I also salted the tops of the cookies just a little, to round the sweetness. Also, I think it’s crucial to just slightly underbake them so they stay chewy and soft. Search for “the verdigris macadamia white chocolate coconut cookies” or use this link: https://www.theverdigris.ca/blog/macadamia-coconut-white-chocolate-cookies #cookies #macadamianuts #coconut #whitechocolate #kitchn #foodfluffer @foodblogfeed #foodblogfeed #instafood #thebakefeed #gloobyfood #hautescuisines #f52grams #huffposttaste #huffpostgram @feedfeed #feedfeed
These bright and sunny cookies are stuffed full of tart lemon curd, and slightly vegetal from a good amount of basil pulsed into the sugar. The result is a chewy, herbaceous cookie that bursts with gooey lemon centres. Link in bio or here www.theverd From the archives: Crispy chocolate peanut butter squares: a candied, crispy puffed cereal base with layers of peanut butter and chocolate, all balanced with a good pinch of flaky salt. It’s like the best combination of a rice-crispy and a Reec Apricot and amaretti crumble - crisp, crumb topping softens on the bottom where it meets thick, gooey, sticky sweet-tart fruit. Crunchy, almond scented amaretti cookies spike through the crumb topping. Plus, fresh apricots look like the cutest little From the archives: A bit of a twist on a classic: these cookies have white chocolate, macadamia nuts and a little toasted coconut. I boosted the coconut flavour with a tiny bit of coconut extract, which you can leave out if you aren’t a fan. Wh

Want to support the Verdigris? Become a patron!